
Creating a quality track is one long process that can be broken down into three shorter processes: producing/editing, mixing, and mastering. Since I started making music about five years ago and began attending school for audio production, my ears have learned many things about each of these processes. For this blog, I want to share some things I have learned specifically about mixing.
After you have created all of your tracks, effected them and arranged them, it is time to mix. Mixing is simply putting your tracks into groups and placing each group in a specific place in space (using primarily EQ, volume automation and reverb). This process allows each track to be heard clearly while not allowing any or all of them to overtake the mix.
After making many tracks with overtone build-ups, quiet drums and washy reverbs, I eventually learned various tricks to avoid these issues. The tips I share in this article are ones that have taken me a long time to figure out, but have dramatically improved the sounds I work with. Of course, there is no right or wrong way to produce a sound. Every sound is worthy of being heard; what you make and how you make it is your unique decision. However, there is a standard of clarity that is sought after when mixing a track, and these techniques have allowed me to more easily reach that standard.
1. EQ
In my opinion, equalization is the most important aspect when it comes to mixing a track well.
When first starting the mixing process, I usually add an EQ to every track. Even if I think that the track sounds fine without EQ, I still add an EQ to the track.
Every track in a song will have built up harmonic frequencies that one may not be able to hear when listening to the soloed track; however, these frequencies will pile up and add unnecessary noise to the track when played as a whole.
A good way to deal with this issue is by adding a slight high pass and low pass shelf to every track. You can determine how much to cut out on each high pass/low pass based on which track you are working with. For example, if you are working with EQ on high hats, you would want a large high pass shelf (cutting out everything under 100 Hz) and a small low pass shelf. If you are working with a bass line, cut out everything above 3kHz with a low pass shelf and use a slight high pass shelf to cut out unnecessary rumble under 20Hz. Remember: even if you can’t hear the unnecessary frequency build up, it is still there! So cutting out what you don’t need in each track, no matter what, will allow your mix to come through more clearly. This method will drastically make your songs much clearer and smoother.
When working with EQ, a common method is to boost instead of cut. From my experience, when it comes to mixing, EQ is much more advantageous when used subtractively. Boosting EQ bands simply adds frequencies as opposed to getting rid of the ones you don’t need. For example, if you are working with the snare and want to bring out the sound around 240Hz (for fatness) and 2.5kHz (for slap), you may want to boost these frequencies. Instead, try lowering everything around these frequencies, leaving 240Hz and 2.5kHz at 0dB. If you do this, you will avoid adding extra unnecessary frequencies and can simply specify the area of the sound you want to emphasize. After you do this, if you wish to make the sound louder, simply turn up the track volume or turn the up EQ gain slightly if you still need more gain.
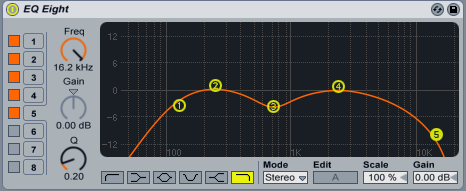
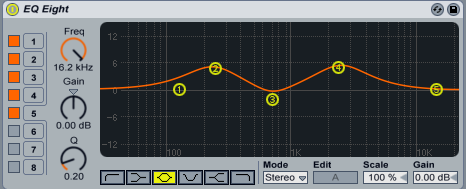
The next two EQ examples both accomplish the same goal –bringing out 240Hz and 2.5kHz. However, the first example (subtractive) cuts out unneeded frequencies while keeping the needed frequencies; the second example (additive) keeps unnecessary frequencies and adds extra harmonic buildup that adds noise to the track as a whole. (Note: If you are trying to boost the volume, use the track fader, this way you can visually see all your gain boosts aligned, instead of having gain boosts on the EQ plug-ins. Later, if your track is peaking, you can rule out EQ gain issues because you haven’t boosted any EQ gains.)
Subtractive EQ Method:
Additive EQ Method:
Subtractive EQ is very beneficial when working with EQ on each track of your final mix. Additive EQ can be beneficial as well if you are attempting to add an effect to a sound or directly enhance a specific frequency.
I used additive EQ methods for a long time (for effecting and for mixing). I was trying to make specific parts of the sound louder, while not taking any of the sound away. However, I eventually realized that an EQ graph is like a box; all the sounds in a song are things you have to fit in that box. If you don’t adjust each sound to make room for the other sounds, then everything won’t smoothly fit into the box.
Subtractive EQ helped me learn to keep the primary frequencies of a sound in the box and to cut out the unneeded ones (to make room for other sounds). Essentially, the sounds you produce are up to you- there is no right or wrong sound- all sound is music. If you are looking to put a bunch of noise in your track, than boosting frequencies may work for you. However, if you feel that your tracks are lacking clarity in the mix, then this EQ method will definitely clean up your sound.
2. Parallel Compression
If you feel like your drums are lacking in punch, fullness or clarity, parallel compression is a great way to drastically improve these areas. You can use parallel compression with any track in the mix, but it is particularly useful with drums.
To begin the process, simply duplicate your drums (duplicate the track with the drum rack, send all drum parts to an aux track, whatever way you wish to double the drums) –this will be your parallel drum track. Place a compressor on the duplicated track and set the compressor so that the parallel drums are highly compressed. To do this, put the threshold down, the ratio at maximum, a longer release and a somewhat late attack (adjust to set past the initial hit of the sound). The goal is to increase the background impact of the drums so that they sound punchy and full.
After you have highly compressed the parallel drum track, you want to lower the volume so that it is not significantly audible but so that it fills out the emptiness of the primary drum track when they are played together. This should really help your drums come through the mix and sound very clear and full.
3. Reverb
What is reverb anyway? Reverb is simply applying a room or specific space to a sound. Your tracks can sound like they are coming from any space (concert hall, gymnasium, outer space, tunnel, etc.) if you use the right reverb. But what happens when you use one space on one track and a different space on another track and then play them at the same time? This would create overlapping spaces-or- overlapping overtones and harmonics.
When applying a reverb, it is a great idea to place an EQ after the reverb plug-in. This way, you can specify what sounds you want to hear from one reverb versus what sounds you want to hear from another reverb that is playing at the same time.
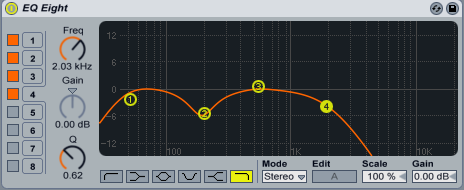
This concept is similar to ducking out unneeded frequencies on the EQ of one track to make room for those frequencies in the EQ of another track. The following two tracks have two different reverbs; an EQ has been applied to both tracks (following the reverb plug-in) and each EQ is set to make room for the other reverb space:
Track 1 EQ (following reverb):
Track 2 EQ (following reverb):
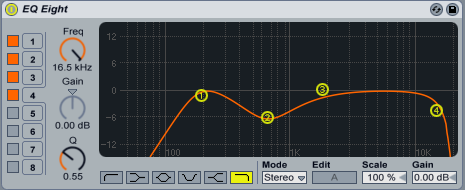
Notice how the EQ settings are essentially opposite of one another- this will allow both reverbs to work at the same time without piling up overtones. The emphasis is on their primary frequencies while cutting out room for each other. This EQ technique is vital when making room for all tracks in a mix, not just for reverb overlap. Always remember to specify primary frequencies with EQ (whether you’re working with a raw instrument or with reverb) and cut out everything else you don’t need. This method will ensure that all the sounds (you’ve worked so hard to make) will have their own space in the mix and will be heard clearly.
4. Spend Time, NOT Money
Having attempted mixing in various spaces- headphones, studio, house- I can say that my most clean and pristine mixes have been made in my car. Why? Because I always listen to music in my car, I’ve produced and mixed hundreds of tracks in there, and I know the space better than any other. In my opinion, the only way to ensure that you get a perfect mix is to spend time mixing in one specific space. It won’t matter if you have the most expensive plug-ins, hardware or studio space. If you know your equipment and your space as well as you know your best friend, you can mix a track with the lowest quality tools and make it sound like it was professionally done. It’s all about learning what frequencies are created or neglected by your space (studio, headphones, car- wherever you mix) and compensating for those frequencies when mixing.
Spend time listening to music in your mixing space and deciding what frequencies are usually louder or quieter. If the low end is usually loud in your space compared to other spaces, then you know that you do not need to boost the bass when mixing. If your mid-range is quieter in your space than in other spaces, make sure to emphasize the mid-range when mixing your tracks. Again, EQ is your best friend.
Lastly, spend time cross-referencing spaces. Even if you know your own mixing space extremely well, it’s always a good idea to cross-reference. Listen to your mix in at least 3 other spaces to get a good idea of what your mix truly sounds like. If you learned your space well and compensated with EQ, than your mix should sound well in most other spaces.
In the end, just do what you do. Don’t let anyone tell you how to make the “perfect sound,” because there is no such thing. Try new techniques, try crazy ideas, try making what you consider a perfect sound- even better! Mixing techniques are especially beneficial to experiment with; they may help you clean up things you didn’t even realize needed cleaning.